
In a world that moves fast, taking the time to make your own veggie chips becomes a quiet act of mindfulness. There’s something soothing about slicing crisp vegetables and watching them turn golden in the oven, filling your space with a warm, earthy scent. It’s more than just snack prep; it’s a small ritual that reconnects you with honest, simple ingredients amid the chaos. Every batch feels like a tiny victory, a moment to breathe and focus on the present.
This recipe isn’t about perfection or crunch for its own sake. It’s about the process—embracing the imperfections, the uneven edges, the occasional burnt corner. Making these chips is a chance to slow down, to notice the textures and flavors of vegetables you might otherwise overlook. It’s a small, mindful act that feeds not just the body but the spirit, especially when life feels overwhelming.
Focusing on how making your own baked veggie chips can be a calming, mindful ritual that reconnects you with simple, honest ingredients amid busy modern life.
The story behind this recipe
- I first started making veggie chips during a particularly busy week when I needed a quiet, grounding activity. Slicing vegetables became a small meditative act, a way to pause and reconnect with what I was actually eating. The smell of roasting carrots and zucchini reminded me of childhood snacks but with a grown-up twist. It’s funny how something so simple can turn into a moment of calm in a hectic day.
- I wanted a snack that felt honest and less processed, a way to enjoy vegetables in a new form.
- There’s a certain satisfaction in watching raw slices transform into crispy chips, almost like magic happening in the oven.
Key ingredients and tips
- Sweet potatoes: I love how their natural sweetness intensifies as they bake, creating a smoky, caramelized flavor. If you want a milder taste, swap in carrots, but expect a lighter crunch.
- Kale: The leaves turn delightfully crispy, almost chip-like, with a slightly nutty aroma. Use sturdy kale, and if they’re too curly, give them a quick chop to ensure even baking.
- Zucchini: Thin slices become tender yet crisp, with a fresh, slightly grassy scent. For a crunchier bite, pat them dry thoroughly before baking—moisture is enemy here.
- Beets: Their earthy, vibrant color and sweet undertone make for striking chips. If you prefer milder flavor, try turnips or parsnips, which bake up similarly but with a subtler taste.
- Olive oil: It’s my secret weapon for golden, crispy edges and a fragrant aroma. For a lighter option, reduce the oil slightly, but don’t skip it—without it, chips can be dull.
- Sea salt: I sprinkle generously for that satisfying crunch and burst of flavor, but if you’re watching sodium, try smoked paprika or a splash of lemon zest for a flavor boost.
- Herbs & spices: A touch of thyme or cumin can elevate the earthy tones. I keep it simple, but feel free to experiment with your favorite dried herbs—just don’t overdo it.
Spotlight on key ingredients
Kale:
- Leaves turn delightfully crispy with a slightly nutty aroma, sometimes curling unexpectedly. Use sturdy leaves for even baking.
- Sweet potatoes: Their natural sugars caramelize beautifully, creating a smoky, oozy richness. Slice thin for maximum crispness and sweet flavor.
Sweet potatoes:
- Olive oil: It’s my secret weapon for golden, crispy edges and a fragrant aroma. Use a light drizzle—too much can make chips greasy.
- Moist and dense, they can be tricky—pat slices dry thoroughly to avoid soggy chips and ensure crispness.
Notes for ingredient swaps
- Dairy-Free: Use olive oil or coconut oil instead of butter for a rich, tropical flavor, keeping it vegan and dairy-free.
- Gluten-Free: Ensure your spice blends are gluten-free or skip pre-made spice mixes altogether for a pure vegetable taste.
- Salt Alternatives: Swap sea salt for smoked paprika or lemon zest to add flavor without extra sodium, enhancing aroma and brightness.
- Oil Choices: Replace olive oil with sesame or avocado oil for different flavor profiles and heat tolerance, adding depth or nuttiness.
- Sweeteners: For a hint of sweetness, sprinkle a touch of cinnamon or honey before baking—expect a warmer, aromatic chip.
- Vegetable Variations: Use parsnips or carrots in place of sweet potatoes for different sweetness levels and textures, keeping the chips crispy.
- Herbs & Spices: Experiment with dried thyme, cumin, or chili powder to customize the flavor profile—less is more, so start light.
Equipment & Tools
- Mandoline or sharp knife: To slice vegetables evenly and thinly for uniform baking.
- Baking sheet: Provides a flat surface to bake the slices.
- Parchment paper: Prevents sticking and makes cleanup easier.
- Wire rack: Allows excess moisture to escape and helps chips crisp as they cool.
- Mixing bowl: To toss slices with oil and spices evenly.
Step-by-step guide to veggie chips
- Gather your equipment: a sharp mandoline or a very steady hand, a baking sheet, parchment paper, and a small bowl for oil. Preheat your oven to 180°C (350°F).
- Slice vegetables uniformly: aim for about 1/8 inch thick. Use the mandoline for even slices—this helps them cook evenly and crisp up nicely.
- Toss slices in oil: in a small bowl, mix a tablespoon of olive oil with your chosen spices. Lightly coat each slice, ensuring no clumps or pooling. This step is key for flavor and crunch.
- Arrange on baking sheet: line with parchment, then lay slices in a single layer without overlapping. Give each a little space to breathe and crisp up.
- Bake for 15-20 minutes: keep an eye after 10 minutes. Swap the sheet halfway through for even browning. Look for golden edges and a slight curl. The smell should be nutty and fragrant.
- Check for doneness: the chips should be crisp and lightly browned. If they’re soft or pale, bake a few minutes longer—watch to prevent burning.
- Cool on a rack: once out of the oven, transfer chips to a wire rack. Let them rest for 5-10 minutes; they’ll crisp up further as they cool. They should crackle when you bite into them.
- Finish and serve: sprinkle with a touch of sea salt or a squeeze of lemon if desired. Serve immediately or store in an airtight container for later use.
Let the chips rest on a wire rack for 5-10 minutes. Serve immediately for maximum crunch, or store in an airtight container once completely cooled to preserve crispness.
How to Know It’s Done
- Edges are golden and slightly curled, indicating crispness.
- Slices crackle when broken or bitten, showing proper dryness.
- Even coloring across all chips without burnt spots.
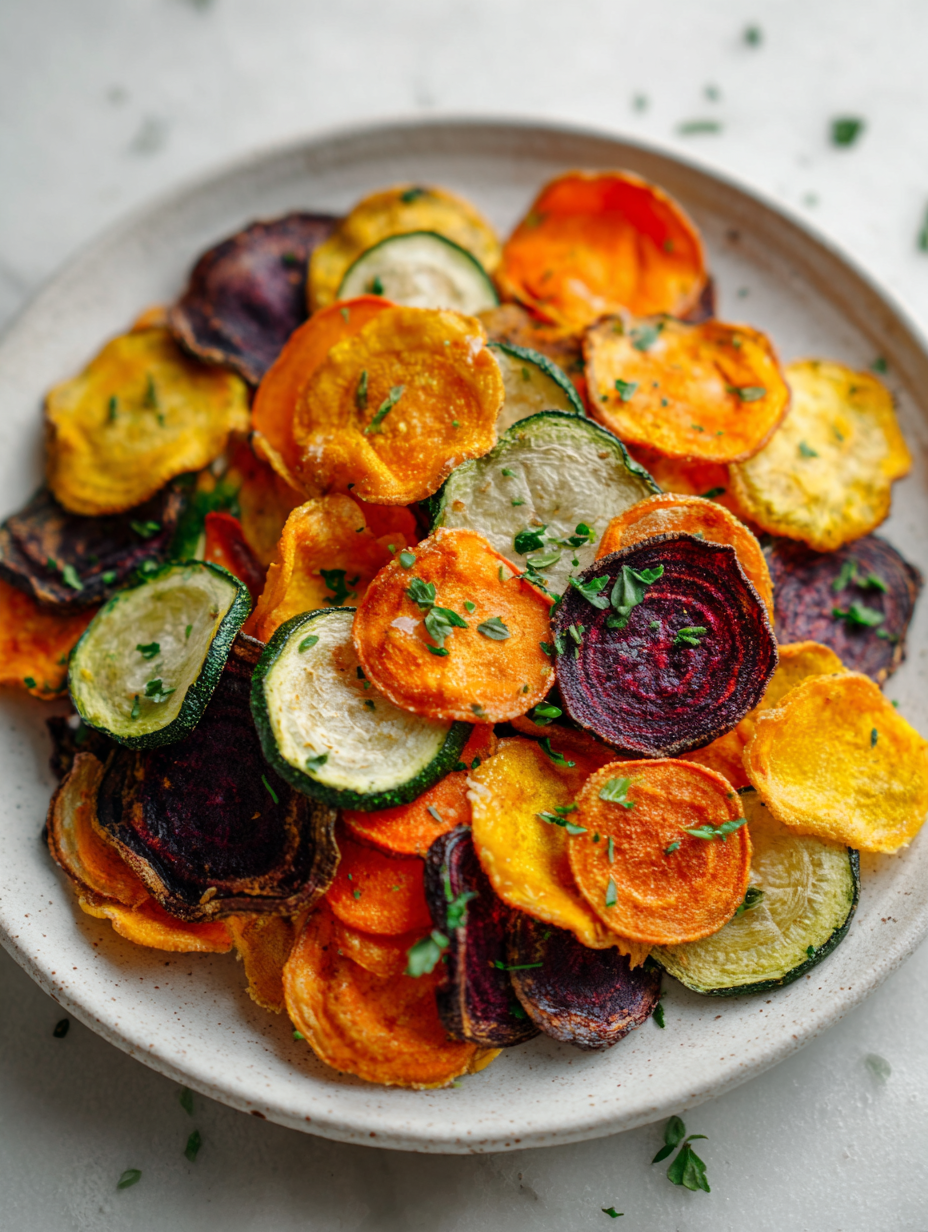
Homemade Baked Veggie Chips
Ingredients
Equipment
Method
- Preheat your oven to 180°C (350°F) and line a baking sheet with parchment paper.
- Using a mandoline or a sharp knife, thinly slice sweet potatoes, zucchini, and beets to about 1/8 inch thick, aiming for even slices for uniform baking.
- Toss all the vegetable slices in a small bowl with olive oil, ensuring each piece is lightly coated without pooling oil.
- Arrange the slices in a single layer on the prepared baking sheet, leaving space between each to allow for crisping.
- Sprinkle the vegetable slices with sea salt and dried thyme for added flavor.
- Bake in the oven for about 15-20 minutes, flipping the slices halfway through, until they turn golden brown and crispy around the edges.
- Once golden and crisp, remove the chips from the oven and transfer them to a wire rack to cool for 5-10 minutes, allowing them to crisp further.
- Enjoy your homemade veggie chips immediately, or store in an airtight container once fully cooled to keep them crispy for later.
Notes
Pro tips for perfect veggie chips
- Use a mandoline for paper-thin, even slices that crisp up uniformly.
- Keep slices spaced out on the baking sheet; overcrowding causes sogginess.
- Toss slices in oil and spices gently—avoid pooling, for even coating and flavor.
- Bake at 180°C (350°F) and check at 15 minutes—look for golden edges and a crackling sound.
- Flip chips halfway through; this ensures even browning and crispness all around.
- Cool chips on a wire rack; this prevents steam from making them soggy and helps crisp up.
Common mistakes and how to fix them
- FORGOT to dry vegetables thoroughly before baking → Causes soggy chips, fix with paper towels.
- DUMPED oil on slices → Use a light, even coating to avoid greasiness and uneven crisping.
- OVER-TORCHED edges → Remove chips early, they burn quickly; keep an eye after 15 minutes.
- MISSED flipping halfway → Flip slices at 10 minutes for even color and texture, prevents uneven baking.
Fast fixes for veggie chips
- When chips look pale, splash with a bit more oil and bake a few minutes longer.
- If chips are soggy, patch with a quick blast under high heat for 2-3 minutes.
- Splash vinegar or lemon after baking for a fresh aroma and to brighten flavors.
- Patch burned edges by scraping or trimming; shield remaining chips with a quick re-bake.
- When in doubt, swap sweet potatoes for carrots—both crisp up well with a milder, sweeter flavor.
Prep, store, and reheat tips
- Prep your vegetable slices a day in advance; store in an airtight container lined with paper towels to absorb excess moisture, keeping them crisp and ready to bake.
- Store baked veggie chips in an airtight container at room temperature for up to 3 days; they’ll stay crispy but may lose some freshness.
- For longer storage, place chips in a sealed freezer bag and freeze for up to 1 month; reheat in a 180°C (350°F) oven until warmed and crisp, about 5 minutes, watching for slight shimmer and crackle.
- Reheating chips can make them lose some crunch if overdone; reheat in small batches, and serve immediately for best texture and aroma.
- Chips may soften over time; crisp them up again in the oven for 3-5 minutes if needed, until they crackle again and smell toasted.
Top questions about veggie chips
1. How thin should I slice the vegetables?
Use a sharp mandoline or a steady hand to cut vegetables evenly about 1/8 inch thick for best crispiness.

2. How much oil do I need for coating?
Toss slices in just enough oil to coat lightly—too much makes them greasy, too little risks uneven browning.
3. What’s the ideal baking time and temperature?
Bake at 180°C (350°F) for 15-20 minutes, flipping halfway; watch for golden edges and a crackling sound.
4. How should I cool the chips?
Let the chips cool on a wire rack for 5-10 minutes; they’ll crisp further as they cool, making that satisfying crackle.
5. What if my chips burn or over-brown?
If you notice burnt edges, remove chips early and reduce baking time next batch; over-baking quickly turns to ash.
6. How long do baked veggie chips last?
Store in an airtight container at room temperature for up to 3 days; for longer, freeze and reheat briefly to crisp.
7. My chips are soggy—how can I fix this?
To fix soggy chips, re-bake at high heat for 2-3 minutes until crispy and fragrant again.
8. How much seasoning should I add?
Use a light hand with herbs and spices—start with small amounts and adjust to taste after baking for best flavor.
9. What vegetables work best for chips?
Choose fresh, firm vegetables; older or wilted produce won’t crisp up well and may turn rubbery.

10. Can I substitute other vegetables?
For variety, try swapping sweet potatoes with carrots or parsnips—each offers a different sweetness and texture.
Making these baked veggie chips is a small act of patience that rewards you with crispy, flavorful bites. Each crunch reminds me that simple ingredients, handled with care, can turn into something truly satisfying. It’s a quiet moment to slow down and enjoy the process, especially when life feels too busy.
These chips aren’t just snacks; they’re a gentle reminder to reconnect with honest food. Whether you’re sharing them with friends or enjoying them solo, they bring a bit of mindful calm into a hectic day. Sometimes, the best comfort comes from a humble, perfectly baked vegetable chip.