
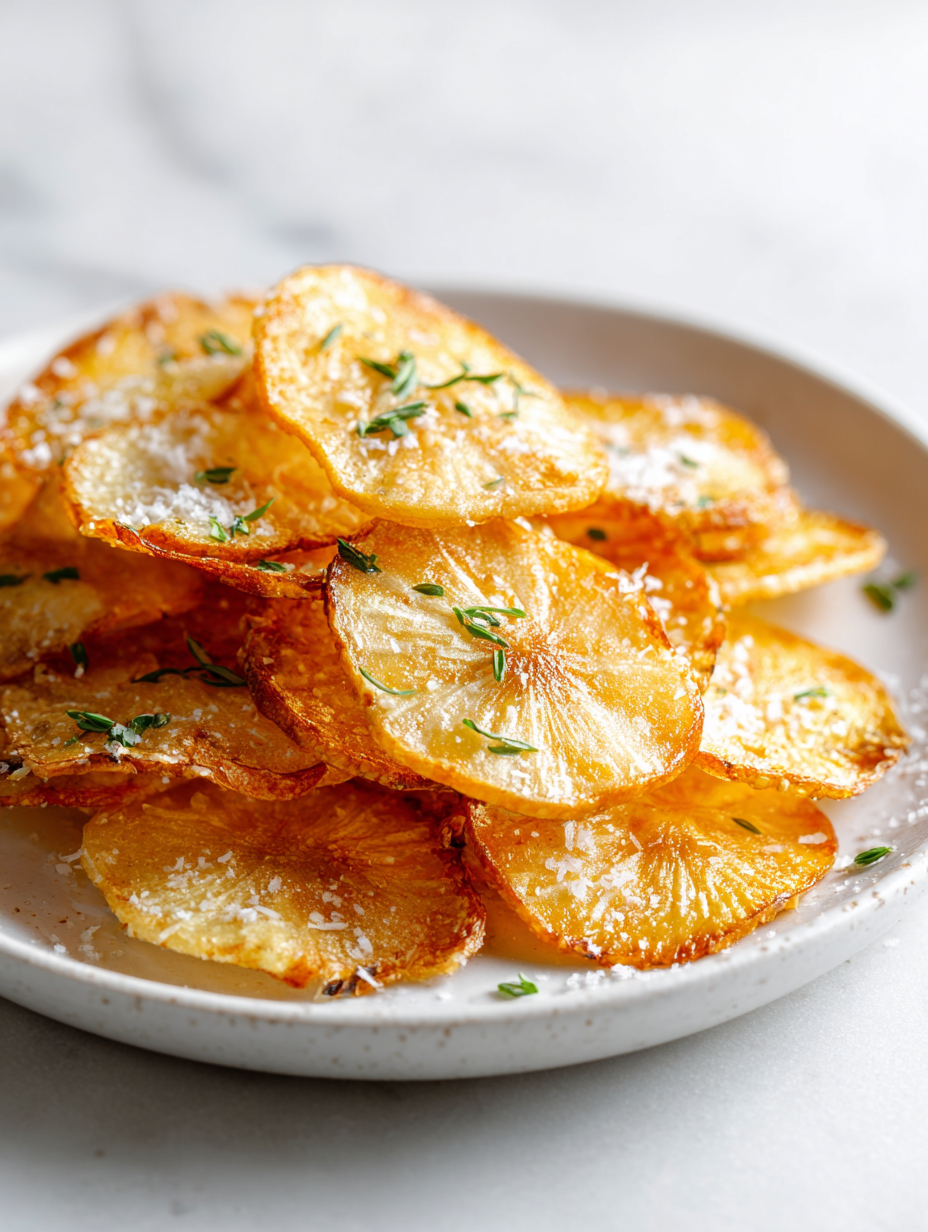
Baking cassava chips instead of frying them is a small shift that makes a big difference. It keeps the natural sweetness of the cassava intact and gives the chips a satisfying chewiness that’s hard to beat. Plus, it’s a lot easier to control the crispness without all that bubbling oil involved.
This method also means you can customize the seasoning without the greasy aftermath. A pinch of smoked paprika, a dusting of sea salt, or even a splash of lime juice can really elevate the simple root into something special. It’s a humble snack that’s surprisingly versatile and perfect for when you want something crunchy but not overly indulgent.
Focusing on how baking cassava chips enhances their natural sweetness and chewy texture, making them more satisfying than frying, and exploring how this method preserves the root’s earthy flavor while creating a crispy snack that’s surprisingly easy to customize with different seasonings.
The story behind this recipe
- I first stumbled upon baked cassava chips during a trip to a small village in Central America. The air was thick with the scent of toasted roots and roasted spices, and I watched locals carefully slicing and baking these earthy, chewy slices until they turned crisp and golden.
- That simple, unassuming snack made me realize how much flavor and texture can come from just a humble root—no frying needed, just patience and a hot oven. It’s become a bit of a ritual for me to make a batch whenever I crave something crunchy and nostalgic, especially on days when I want to avoid greasy snacks.
- Baking these chips not only preserves their natural sweetness but also highlights their chewy, satisfying bite. It’s a small act of turning humble ingredients into something a little more special, reminding me that sometimes simplicity is the best trick in the kitchen.
Ingredient breakdown: key components
- Cassava: I love the earthy, slightly sweet flavor of fresh cassava; make sure to peel it thoroughly for the best texture. You can swap it for sweet potato if you prefer a sweeter, softer chip, but the baking time will differ.
- Olive oil: Using a good-quality, mild olive oil helps achieve a light, golden finish with a slightly fruity aroma. If you skip it or use a spray, the chips might not brown evenly, and you’ll lose some richness.
- Sea salt: I prefer flaky sea salt for a burst of briny contrast; sprinkle it right after baking while the chips are still warm. For a different twist, try smoked salt to add depth, but go easy—over-salting can overpower the natural flavor.
- Paprika (smoked or sweet): A pinch brings a subtle smoky warmth that complements the earthy cassava. If you want heat, add a dash of cayenne; if not, skip it for a milder, more straightforward chip.
- Lemon juice: Just a splash before baking adds brightness and enhances the natural sweetness. You can omit it for a more neutral flavor or replace with lime zest for a zesty kick, but don’t skip the acid altogether—it balances the richness.
- Optional seasonings: Garlic powder, cumin, or even a sprinkle of cinnamon can personalize your chips. I stick to simple salt and paprika most times—less fuss, more flavor clarity.
- Cooking parchment: I always line my baking sheet to prevent sticking and ensure even crisping. If you don’t have parchment, a silicone baking mat works just as well, but avoid greasing the sheet heavily—oil is enough.
Spotlight on key ingredients
Cassava:
- I love its earthy, slightly sweet aroma that intensifies when baked; peeling thoroughly is crucial for smooth slices. Swap with sweet potato for a sweeter, softer crunch, but adjust baking time accordingly.
- Olive oil: I prefer a mild, high-quality olive oil for even browning and a subtle fruity aroma; using less or a spray might lead to uneven color, but it still crisps up nicely.
Paprika:
- Sea salt: I like flaky sea salt for a briny burst that enhances the natural sweetness. Sprinkle while warm for best flavor. Smoked salt adds depth but use sparingly so it doesn’t overwhelm the earthy notes.
- A pinch of smoked or sweet paprika adds a lovely smoky warmth and vibrant color; for a bit of heat, toss in a dash of cayenne, but keep it subtle to let the cassava shine.
Notes for ingredient swaps
- Fresh Cassava: I love the earthy, slightly sweet flavor of fresh cassava; make sure to peel it thoroughly for the best texture. You can swap it for sweet potato if you prefer a sweeter, softer chip, but the baking time will differ.
- Olive Oil: Using a good-quality, mild olive oil helps achieve a light, golden finish with a slightly fruity aroma. If you skip it or use a spray, the chips might not brown evenly, and you’ll lose some richness.
- Sea Salt: I prefer flaky sea salt for a burst of briny contrast; sprinkle it right after baking while the chips are still warm. For a different twist, try smoked salt to add depth, but go easy—over-salting can overpower the natural flavor.
- Paprika (smoked or sweet): A pinch brings a subtle smoky warmth that complements the earthy cassava. If you want heat, add a dash of cayenne; if not, skip it for a milder, more straightforward chip.
- Lemon Juice: Just a splash before baking adds brightness and enhances the natural sweetness. You can omit it for a more neutral flavor or replace with lime zest for a zesty kick, but don’t skip the acid altogether—it balances the richness.
- Optional Seasonings: Garlic powder, cumin, or even a sprinkle of cinnamon can personalize your chips. I stick to simple salt and paprika most times—less fuss, more flavor clarity.
- Cooking Parchment: I always line my baking sheet to prevent sticking and ensure even crisping. If you don’t have parchment, a silicone baking mat works just as well, but avoid greasing the sheet heavily—oil is enough.
Equipment & Tools
- Mandoline or sharp knife: To slice cassava very thin for even crisping.
- Baking sheet: To hold the slices during baking.
- Parchment paper or silicone mat: To prevent sticking and promote crisping.
- Mixing bowl: To toss the slices with oil and seasonings.
- Spatula or tongs: To flip or turn slices for even baking.
Step-by-step guide to baked cassava chips
- Preheat your oven to 200°C (390°F). Line a baking sheet with parchment paper or a silicone mat to prevent sticking.
- Peel the cassava thoroughly, removing any tough skin, and slice it very thin—about 2 mm or 1/16 inch—using a sharp mandoline or a very steady hand with a knife.
- Toss the sliced cassava in a bowl with a tablespoon of olive oil, a pinch of sea salt, and a splash of lemon juice. Ensure all slices are evenly coated.
- Spread the slices in a single layer on the prepared baking sheet. Avoid overlapping to ensure even crisping.
- Bake for about 15-20 minutes. Check at 15 minutes; the edges should start to turn golden and crispy, with a slight curl. If they’re still soft, continue baking, watching closely.
- Halfway through, rotate the sheet and flip the slices if possible, to promote even baking. This helps prevent burning on one side.
- Once golden and crispy, remove from oven. Let the chips cool on the sheet for 5 minutes; they will firm up as they cool.
- For extra crunch, you can bake for an additional 2-3 minutes if needed, but watch carefully to prevent burning.
- Finish by sprinkling a little extra sea salt or smoked paprika while still warm. Serve immediately or store once cooled.
- If the chips are not crispy enough after cooling, briefly return them to the oven at 180°C (355°F) for 2-3 minutes, watching to avoid over-baking.
Allow the chips to cool completely on the baking sheet. Serve immediately for maximum crunch, or store in an airtight container once cooled. Reheat in a low oven if needed, just until crisp.
How to Know It’s Done
- Edges are golden and slightly curled, with a crackling sound when cooled.
- The chips feel firm and snap easily when broken, not floppy or bendy.
- A quick taste reveals a light, earthy sweetness with a smoky, toasted aroma.
Baked Cassava Chips
Ingredients
Equipment
Method
- Preheat your oven to 200°C (390°F) and line a baking sheet with parchment paper or a silicone mat.
- Using a mandoline or a sharp knife, peel the cassava thoroughly and slice it into very thin rounds, about 2 mm thick. The thinner the slices, the crispier they will become.
- Place the sliced cassava in a mixing bowl and drizzle with olive oil. Toss gently to ensure all slices are lightly coated with oil.
- Add a splash of lemon juice and a pinch of sea salt to the bowl. Toss again to evenly distribute the seasonings.
- Spread the seasoned cassava slices in a single layer on the prepared baking sheet, making sure they don't overlap for even crisping.
- Bake for 15-20 minutes, checking at the 15-minute mark. The edges should turn golden and crispy, and the slices will produce a crackling sound as they cool.
- Halfway through baking, use tongs or a spatula to flip or rotate the slices for even cooking and coloration.
- Once the slices are golden brown and crispy, remove the baking sheet from the oven and let the chips cool for about 5 minutes. They will firm up as they cool down.
- If you'd like to add an extra smoky flavor, sprinkle a pinch of smoked paprika over the chips while they’re still warm.
- Serve the chips immediately for the best crunch, or store in an airtight container once cooled for up to two days. To re-crisp, briefly bake at 180°C (355°F) for 2-3 minutes.
Pro tips for perfect baked cassava chips
- Thin slices are crucial → Use a mandoline for even, delicate cuts that crisp up perfectly.
- Avoid overcrowding → Spread slices in a single layer on the baking sheet to promote uniform baking.
- Keep an eye on edges → Remove chips once edges turn golden and crackle, not burnt or dark brown.
- Use moderate heat → Bake at 200°C (390°F); too high and they burn, too low and they won’t crisp.
- Flip halfway → Turn slices or rotate sheet at 10-minute mark for even color and texture.
- Cool completely before storing → Let chips rest 10 minutes to firm up, avoiding sogginess in storage.
- Adjust baking time as needed → If not crispy after cooling, bake 2 more minutes, watching closely.
Common mistakes and how to fix them
- FORGOT to check for even slices → Slicing thickness is key for uniform crispness.
- DUMPED too much oil → Use just enough to lightly coat slices; excess oil makes them greasy.
- OVER-TORCHED the chips → Remove when edges are golden and crispy, not dark brown or burnt.
- SKIPPED resting time → Let chips cool completely for maximum crunch and flavor development.
Kitchen fixes for perfect cassava chips
- When chips are too soft, splash them back in the oven for 2 minutes to re-crisp.
- If slices stick, patch with a quick spray of oil and gently separate before baking again.
- Over-torched chips? Ditch the darkest ones and shield the rest with foil for even baking.
- Forgot to check for doneness? Crinkle a slice; if it crackles loudly, it’s ready.
- When your pantry lacks fresh cassava, swap with sweet potato for a sweeter, softer alternative.
Prep, store, and reheat tips
- Peel and slice the cassava ahead of time; store in an airtight container in the fridge for up to 24 hours to prevent browning and maintain freshness.
- You can prepare the seasoned slices up to a day in advance, keeping them covered in the fridge to allow flavors to meld slightly.
- Store cooled, crispy chips in an airtight container at room temperature for up to 2 days; they may lose some crispness over time but can be refreshed in the oven.
- Reheat in a 180°C (355°F) oven for 3-5 minutes until they shimmer with a slight crackle, restoring some of their original crunch.
- Avoid refrigerating for longer than a day or two as the chips may absorb moisture and become soggy, losing their crisp texture.
FAQs about Baked Cassava Chips
1. How thin should I slice the cassava?
Use thinly sliced cassava, about 2 mm thick, for even baking and crisp texture.
2. What’s the ideal baking temperature and time?
Bake at 200°C (390°F) for 15-20 minutes until edges are golden and crackling.
3. Should I let the chips cool before eating?
Cooling on a rack for 10 minutes helps chips firm up and stay crispy.
4. What’s the best way to prepare my baking sheet?
Use parchment paper or a silicone mat to prevent sticking and promote even crisping.
5. How do I fix soggy chips?
If chips are too soft, bake 2 more minutes, watching closely to prevent burning.
6. How should I store leftover chips?
Store cooled chips in an airtight container at room temperature for up to 2 days.
7. Can I re-crisp the chips later?
Reheat in a 180°C (355°F) oven for 3-5 minutes to restore crunch.
8. When is the best time to add seasonings?
For extra flavor, sprinkle smoked paprika or sea salt while the chips are still warm.
9. What equipment helps make perfect slices?
Using a mandoline ensures uniform, thin slices for consistent crispiness.
10. How do I prevent the chips from sticking together?
Avoid overlapping slices on the baking sheet; spread them out for even baking.
Baked cassava chips are a reminder that simple ingredients can deliver complex satisfaction. Their earthy aroma and crisp bite make them a surprisingly addictive snack, especially when you want something wholesome without the guilt.
Whenever I make a batch, I’m struck by how a humble root can turn into something so satisfying. It’s a small, honest pleasure that fits into busy days and lazy afternoons alike, grounding me in familiar flavors and straightforward techniques.