
There’s something soothing about slicing vegetables slowly, watching them thin and even, feeling the textures under your fingertips. Making baked vegetable chips isn’t about quick gratification; it’s a mindful act that turns kitchen chaos into calm. The process invites you to slow down, breathe, and focus on the simple rhythm of preparation.
In a world obsessed with instant snacks, these chips remind me that patience can be nourishing, both for the body and mind. Each batch is a quiet meditation—crisping in the oven, filling the kitchen with the earthy scent of roasted veg. It’s a small ritual that transforms humble ingredients into something satisfying and beautifully homemade.
Focusing on how making baked vegetable chips can be a mindful, meditative act that transforms simple ingredients into a calming kitchen ritual, emphasizing the slow, intentional process over quick snack fixes.
The story behind this recipe
- Making these vegetable chips started as a way to use up odds and ends from my fridge. I kept finding thin slices of sweet potato, beet, and zucchini, just waiting for a purpose. Baking them turned into a quiet, almost meditative act I craved after hectic days. It’s funny how something so simple can become a small ritual that resets your mood.
- One afternoon, I was feeling overwhelmed, and slicing those vegetables slowly helped me reconnect with the process of creating something nourishing. The smell of roasting veg filled my tiny kitchen, grounding me again. Now, it’s my go-to for turning leftovers into a snack that feels thoughtful, not wasteful.
- heading: The story behind this recipe
Ingredient breakdown: key components
- Sweet potatoes: I love their natural sweetness and vibrant orange hue, which caramelizes beautifully in the oven—swap with carrots if you want a milder flavor, but expect a softer texture.
- Beets: Their earthy aroma intensifies as they roast, adding a stunning magenta crunch—try kohlrabi for a similar texture but milder taste.
- Zucchini: Thinly sliced zucchini crisps up quickly and offers a light, delicate bite—consider yellow squash for a slightly sweeter note, but keep an eye on the moisture.
- Olive oil: I prefer a drizzle that lightly coats each slice, helping them crisp—use avocado oil for a neutral flavor, but less smoky aroma.
- Salt: A pinch enhances the natural veggie flavors and balances the sweetness—sea salt works best, but smoked salt adds a smoky depth.
- Pepper and spices: A dash of paprika or cumin can add warmth—experiment with chili powder for extra kick, but watch out for overpowering the vegetable flavor.
- Optional herbs: Fresh thyme or rosemary sprinkle adds aromatic complexity—dried herbs are fine if fresh isn’t on hand, but use sparingly to avoid overpowering.
Spotlight on key ingredients
Sweet potatoes:
- Their natural sweetness deepens as they roast, creating a caramelized, oozy interior with a smoky aroma. Thin slicing enhances their crispness and allows the sugars to develop fully.
- Beets: Their vibrant magenta color intensifies during baking, and they develop an earthy, slightly sweet flavor. Their moisture content makes them prone to curling, so even slices are key for crispness.
Zucchini and Olive oil:
- Zucchini: Thinly sliced zucchini crisps quickly, offering a delicate, almost fragile texture. They tend to release moisture, so even slices are essential for even baking and a satisfying crunch.
- Olive oil: Lightly coating the slices helps them crisp without greasiness. The oil’s fruity, peppery notes become intensified as they bake, creating a rich aroma that complements the vegetables.
Notes for ingredient swaps
- Sweet potatoes: I love their natural sweetness and vibrant orange hue, which caramelizes beautifully in the oven—swap with carrots if you want a milder flavor, but expect a softer texture.
- Beets: Their earthy aroma intensifies as they roast, adding a stunning magenta crunch—try kohlrabi for a similar texture but milder taste.
- Zucchini: Thinly sliced zucchini crisps up quickly and offers a light, delicate bite—consider yellow squash for a slightly sweeter note, but keep an eye on the moisture.
- Olive oil: I prefer a drizzle that lightly coats each slice, helping them crisp—use avocado oil for a neutral flavor, but less smoky aroma.
- Salt: A pinch enhances the natural veggie flavors and balances the sweetness—sea salt works best, but smoked salt adds a smoky depth.
- Pepper and spices: A dash of paprika or cumin can add warmth—experiment with chili powder for extra kick, but watch out for overpowering the vegetable flavor.
- Optional herbs: Fresh thyme or rosemary sprinkle adds aromatic complexity—dried herbs are fine if fresh isn’t on hand, but use sparingly to avoid overpowering.
Equipment & Tools
- Mandoline or sharp knife: To slice vegetables evenly and very thin.
- Large mixing bowl: To toss slices with oil and spices.
- Baking sheet with parchment: To bake chips evenly and prevent sticking.
- Wire rack: To cool chips and maintain crispness.
Step-by-step guide to vegetable chips
- Preheat your oven to 180°C (350°F). Line a large baking sheet with parchment paper to prevent sticking.
- Choose your vegetables: sweet potatoes, beets, zucchini. Wash thoroughly. Use a mandoline or a sharp knife to slice them very thin—about 1/8 inch. Thinner slices crisp up better.
- Place the slices in a large bowl. Drizzle with a tablespoon of olive oil, toss gently to coat evenly. Don’t overdo it; a light coating is enough.
- Sprinkle with salt and any spices you like—paprika, cumin, or chili powder. Toss again to distribute spices evenly.
- Arrange the slices in a single layer on the prepared baking sheet. Overlapping is fine, but avoid stacking slices to ensure crispness.
- Bake in the oven for about 15-20 minutes. Check around the 15-minute mark. They should turn golden and crisp around the edges. Keep an eye on them to prevent burning.
- If some slices are still soft or pale, continue baking in 2-minute intervals. If edges brown too quickly, lower oven temperature slightly or shift the sheet to a lower rack.
- Once crisp and golden, remove from the oven. Let them rest on the sheet for 5 minutes. They will firm up as they cool.
- Transfer to a wire rack to cool completely. This prevents sogginess and keeps them crisp.
- Taste and adjust seasoning if needed. Serve immediately or store for later.
Allow chips to cool completely on a wire rack. Serve immediately for maximum crispness. Store in an airtight container at room temperature for up to 2 days to keep them crispy.
How to Know It’s Done
- Color: Edges should be golden brown without burning.
- Texture: Chips should snap when broken, not bend.
- Appearance: Uniform thin slices with minimal curling or warping.
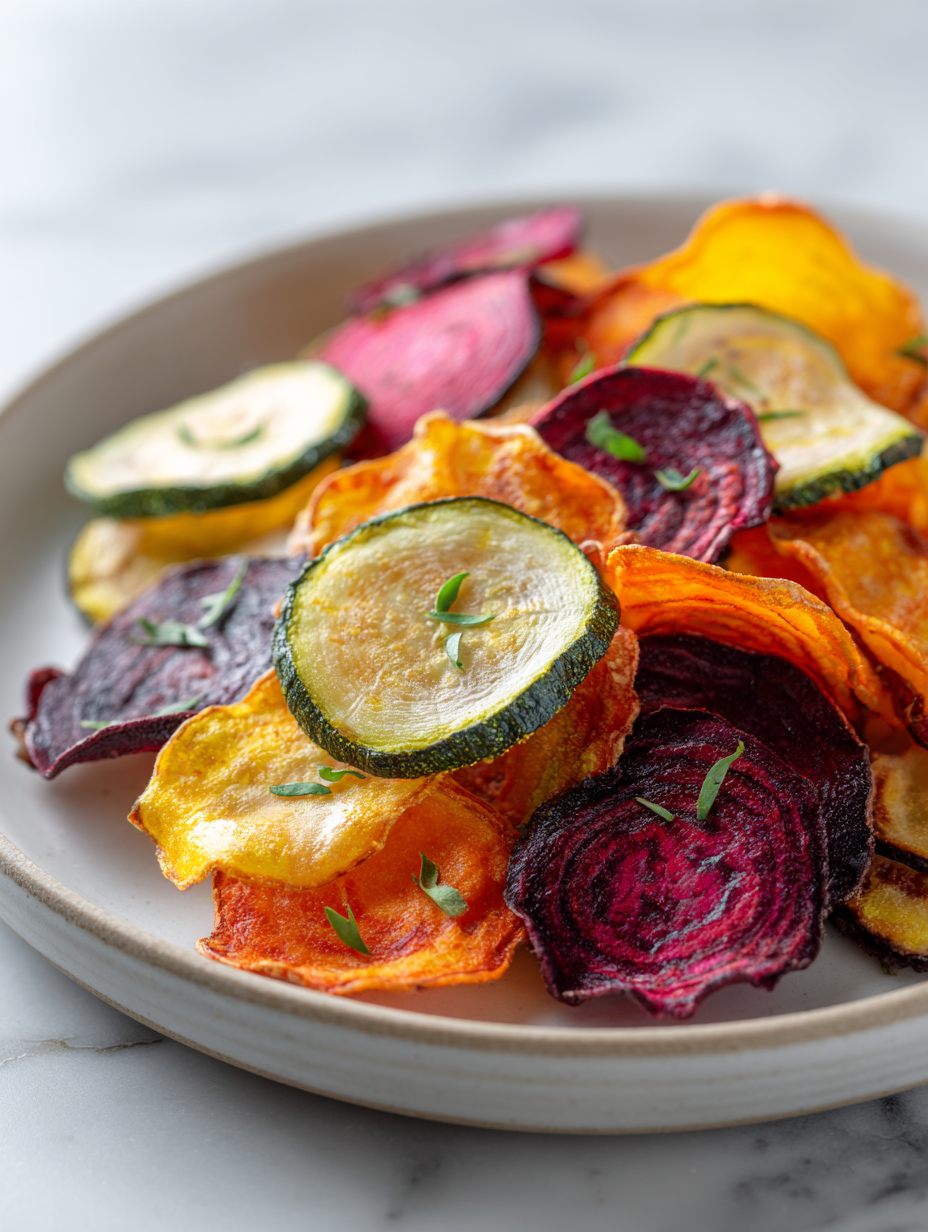
Baked Vegetable Chips
Ingredients
Equipment
Method
- Start by preheating your oven to 180°C (350°F). Line a baking sheet with parchment paper to ensure easy removal and crisping.
- Use a mandoline or a sharp knife to slice the vegetables as thinly and evenly as possible—about 1/8 inch thick. Thinner slices will crisp up beautifully and give you that delicate crunch.
- Place all the slices into a large mixing bowl. Drizzle with a tablespoon of olive oil and sprinkle with sea salt and paprika. Toss gently with your hands or a spoon until each slice is lightly coated and seasoned evenly.
- Arrange the slices in a single layer on the prepared baking sheet, making sure they don’t overlap too much. Spacing them out helps them crisp evenly and prevents sogginess.
- Bake the chips in the oven for about 15-20 minutes. Keep an eye on them after 15 minutes; they should turn golden around the edges and become crisp. If some slices are still soft, continue baking in 2-minute intervals until perfectly crisped.
- Once they’re golden and crunchy, remove the baking sheet from the oven. Let the chips cool on the sheet for 5 minutes—this helps them set and become even crispier.
- Transfer the cooled chips to a wire rack to cool completely, which prevents them from becoming soggy. Serve immediately for maximum crunch, or store in an airtight container for up to 2 days.
Notes
Pro tips for perfect vegetable chips
- Thinness: Use a mandoline for perfectly even slices that crisp uniformly.
- Oil Lightly: Toss slices with just enough oil to coat—avoid pooling to prevent sogginess.
- Spice Distribution: Sprinkle spices evenly and toss again to ensure flavor in every bite.
- Watch the Time: Keep a close eye after 15 minutes; chips can go from crisp to burnt quickly.
- Cooling: Rest chips on a wire rack to maintain maximum crunch and prevent sogginess.
- Thin Slices: Aim for about 1/8 inch thickness—thinner slices crisp up better and faster.
- Even Spacing: Arrange slices in a single layer on the baking sheet to promote even baking.
Common mistakes and how to fix them
- FORGOT to check oven temperature → Use an oven thermometer for accuracy.
- DUMPED excess oil → Use just enough to lightly coat slices, avoid sogginess.
- OVER-TORCHED chips → Lower oven temp or reduce baking time; chips should be golden, not burnt.
- MISSED even slices → Use a mandoline for uniform thickness, ensuring even crisping.
Quick fixes and pantry swaps
- When chips curl, lower oven temp or cut slices thinner.
- Splash a little lemon juice on veggies to prevent browning.
- Patch soggy chips by returning them to a hot oven for a few minutes.
- DUMPED too much oil? Lightly dab with paper towels before baking again.
- When smell is burnt, remove chips immediately to avoid bitter flavor.
Prep, store, and reheat tips
- Pre-slice vegetables the night before to save time; keep them in an airtight container in the fridge, wrapped in a damp towel to prevent drying out. They stay fresh and crisp for up to 24 hours, with minimal loss of texture.
- Store baked chips in an airtight container at room temperature for up to 2 days; they will remain crispy if kept dry and away from humidity. Reheat in a 150°C (300°F) oven for 3-5 minutes until warm and crisp, with a slight shimmer of oil returning to surface.
- Chips lose crunch as they sit, so best enjoyed fresh; if they soften, a quick re-bake at 180°C (350°F) for 2-3 minutes will restore some crispness and intensify aromas.
- Avoid refrigerating baked chips, as moisture in the fridge makes them soggy. Instead, keep them in a cool, dry place in a sealed container for maximum crunch and flavor preservation.
Top questions about vegetable chips
1. How thin should I slice the vegetables?
Use a sharp knife or mandoline to slice vegetables very thinly, about 1/8 inch, for crispiness.

2. What’s the ideal baking temperature and time?
Bake at 180°C (350°F) for 15-20 minutes, flipping halfway, until golden and crisp.
3. How much oil should I use?
Lightly coat slices with olive or avocado oil; too much makes them soggy, too little won’t crisp them.
4. Do I need a special baking sheet or parchment?
Use parchment paper to prevent sticking and promote even baking. Keep a close eye in the last few minutes.
5. How should I store leftovers?
Store cooled chips in an airtight container for up to 2 days; reheat at 150°C (300°F) for crispness.
6. What if my chips don’t turn out crispy?
If chips curl or burn, lower oven temp or slice vegetables thinner for even crisping.
7. How can I ensure even crispiness?
Use a mandoline for uniform slices. Keep slices separated on the baking sheet to prevent sticking.
8. Can I spice up my chips?
Add spices like paprika or cumin for flavor, but don’t overdo it to keep the vegetable taste clear.
9. Can I reheat or refresh stale chips?
Chips are best enjoyed fresh, but re-baking soft ones for 3-5 minutes can revive crispness.
10. Which vegetables work best for chips?
Choose vegetables with low moisture content, like sweet potatoes or beets, for better crunch.
These baked vegetable chips are more than just a snack; they’re a quiet act of mindfulness, turning simple slices into something crispy and satisfying. Making them reminds me to slow down and enjoy the small, deliberate moments in the kitchen.
Whenever I need a calming break from the chaos, a batch of these chips helps me reconnect with the process of creating something nourishing. They’re a little ritual that offers comfort and a crunch that’s hard to beat, especially when shared with someone who appreciates the effort behind each bite.