
Roasting garlic alongside chickpeas transforms this humble snack into something richer and more complex. The garlic gets mellow and sweet, developing a slightly smoky flavor that seeps into every crunchy bite. It’s a small step that makes a big difference, turning everyday pantry staples into a savory treat.
I love how simple ingredients can surprise you when treated right. This recipe is about embracing those moments — peeling back the layers of flavor that roasting unlocks, without fuss or fancy techniques. It’s honest food, meant to be munched straight from the baking sheet, preferably still warm.
Once you try roasted garlic chickpeas, store-bought roasted snacks will seem dull. This is about getting your hands a little dirty, smelling that garlic aroma fill the kitchen, and savoring a snack that’s satisfying and oddly nostalgic. It’s a quick fix for when you need something flavorful and crunchy, no complicated steps required.
Focusing on the surprising depth of flavor that roasting garlic adds to simple chickpeas, transforming them from everyday snack to a crave-worthy treat you can’t stop munching.
The story behind this recipe
- I first stumbled upon this idea when I was late for a dinner party and needed a quick snack. Roasting garlic with chickpeas was an afterthought, but the aroma pulled me right in. That warm, slightly smoky garlic scent made me realize how much flavor you can coax out of simple pantry staples with just a bit of heat. Now, it’s my go-to for a fuss-free, satisfying nibble.
- There’s something about the way roasting transforms garlic—softening the bite, blooming into a sweet, mellow depth—that makes the chickpeas taste richer. It’s like giving them a gentle, smoky hug. Over the years, I’ve tweaked this recipe, adding a dash of smoked paprika or a squeeze of lemon, but the core remains the same: honest, unpretentious, and deeply delicious.
- heading: ‘The story behind this recipe’
Ingredient breakdown: key components
- Garlic: I love how roasting turns garlic into a sweet, mellow, almost caramel-like flavor that deepens as it cooks. Skip the raw, pungent bite and embrace that smoky aroma filling your kitchen.
- Chickpeas: For maximum crunch, I prefer canned chickpeas that I dry thoroughly and roast at high heat. If yours are too moist, they won’t crisp up properly—pat them well before roasting.
- Olive oil: A good splash helps the garlic and chickpeas roast evenly and develop a golden crust. If you want less fat, just use a light drizzle; the flavor will still shine through.
- Spices: I often toss in smoked paprika or cumin for an extra smoky kick. Keep the seasoning balanced—too much can overpower the gentle garlic sweetness, so start small.
- Salt: I find a generous pinch at the end really pulls all the flavors together. Don’t overlook this step—it’s the final flavor boost that makes everything pop.
- Lemon juice (optional): Just a squeeze brightens the whole dish and adds a fresh contrast to the roasted garlic. Add it after roasting for the best effect.
- Optional herbs: A sprinkle of chopped parsley or cilantro right before serving adds a fresh, herbal note that lifts the whole thing.
Spotlight on key ingredients
Garlic:
- Roasting mellows its pungency, turning it sweet and smoky. The aroma fills the kitchen, making everything feel inviting.
- Chickpeas: When dry and well-spaced, they turn crispy and golden. Their firm, nutty bite contrasts beautifully with the tender garlic.
Spices:
- Olive oil: It helps everything roast evenly, developing a rich, golden crust. The oil’s subtle fruitiness enhances the overall flavor.
- Toasted paprika or cumin releases aromatic oils, adding depth. Be cautious—over-toasting can make them bitter if burnt.
Notes for ingredient swaps
- Oil-Free: Use a splash of vegetable broth or water to keep chickpeas from sticking, though they may be less crispy.
- Garlic Variations: Roasted shallots or roasted onion can add sweetness and depth, but expect a different aroma profile.
- Spice Mixes: Swap smoked paprika for regular paprika or cumin for earthiness—adjust quantity to balance smoky flavor.
- Lemon Juice: Lime juice or vinegar can brighten the dish similarly, but may alter the overall freshness and tang.
- Herbs: Fresh thyme or rosemary can replace parsley or cilantro, adding aromatic complexity that holds up during roasting.
- Chickpea Type: Use dried and cooked chickpeas for a more textured bite—just soak and cook thoroughly before roasting.
- Oil Alternatives: Use avocado oil or sesame oil for different flavor notes; keep in mind they have distinct aromas and smoke points.
Equipment & Tools
- Baking sheet: To roast the chickpeas evenly
- Parchment paper: For easy cleanup and preventing sticking
- Mixing bowl: To toss and coat the chickpeas and garlic
- Knife and cutting board: To prepare garlic cloves
Step-by-step guide to roasted garlic chickpeas
- Preheat your oven to 200°C (400°F). Line a baking sheet with parchment paper for easy cleanup.
- Drain and rinse a can of chickpeas thoroughly. Pat them dry with a clean towel until as moisture-free as possible.
- Take 4-5 garlic cloves, peel them, and crush slightly with the side of a knife to release more flavor.
- In a bowl, toss chickpeas with 2 tablespoons of olive oil, the crushed garlic, 1 teaspoon smoked paprika, and a pinch of salt. Mix well until evenly coated.
- Spread chickpeas in a single layer on the prepared baking sheet. Make sure they’re not crowded—airflow helps crisping.
- Roast in the oven for 25-30 minutes. Shake the pan halfway through. Look for a golden-brown color and crispy edges.
- Check for doneness: chickpeas should be crunchy, garlic should be fragrant and slightly caramelized, and the spices should be toasted.
- Remove from oven and let cool slightly for 5 minutes. Taste-test a chickpea—should be crisp and flavorful, with mellow garlic aroma.
- If desired, squeeze a little fresh lemon juice over the warm chickpeas for brightness. Toss gently to combine.
- Serve immediately or store in an airtight container. These are best enjoyed within 3 days for maximum crunch.
Let the chickpeas cool for 5 minutes after roasting. Serve warm for best crunch. For storage, keep in an airtight container at room temperature up to 3 days. Reheat briefly in the oven if needed, until crispy again.
How to Know It’s Done
- Chickpeas are golden and crispy, with a firm bite.
- Garlic is mellow, fragrant, not burnt or bitter.
- Spices are toasted and aromatic, not raw or dull.
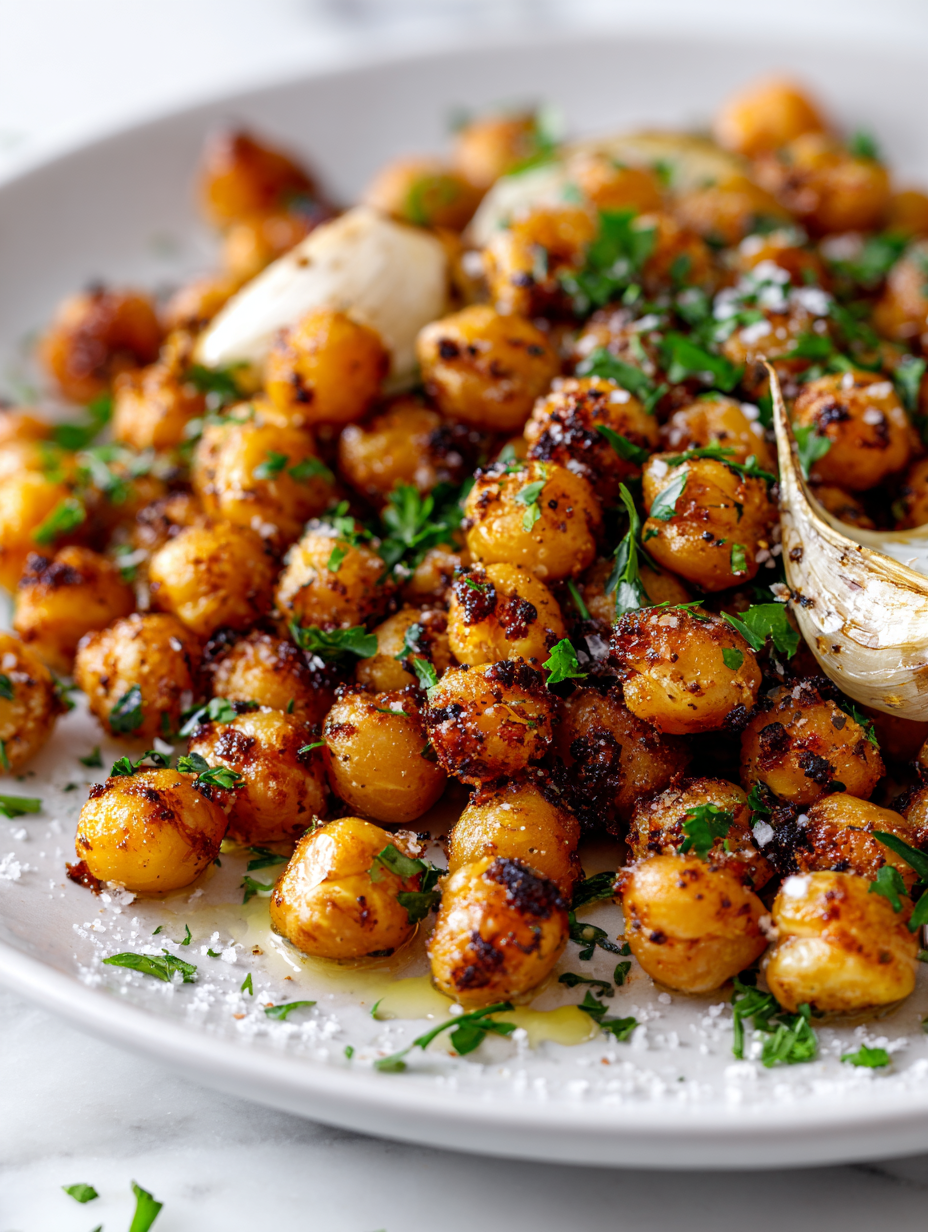
Roasted Garlic Chickpeas
Ingredients
Equipment
Method
- Preheat your oven to 200°C (400°F) and line a baking sheet with parchment paper to keep things tidy.
- Drain and rinse the canned chickpeas thoroughly, then pat them dry with a clean towel until they feel dry and crispy—this helps them crisp up during roasting.
- Peel the garlic cloves and crush them slightly with the side of a knife to release their fragrant oils and mellow their pungency.
- In a mixing bowl, toss the chickpeas with olive oil, crushed garlic, smoked paprika if using, and a pinch of salt. Mix everything well to coat each chickpea evenly with the flavorful oil and spices.
- Spread the coated chickpeas out in a single layer on the prepared baking sheet, making sure they aren’t overcrowded so they can crisp up nicely.
- Roast the chickpeas in the oven for about 25-30 minutes, shaking the pan halfway through to promote even crisping and prevent sticking. Keep an eye on them—they should turn golden brown and crispy.
- Once they’re crisp and fragrant, remove the baking sheet from the oven and let the chickpeas cool slightly for 5 minutes—this helps them set and enhances their crunch.
- If you like, squeeze a little fresh lemon juice over the warm chickpeas to add brightness and toss gently to distribute the flavor evenly.
- Transfer the roasted garlic chickpeas to a bowl or serve straight from the baking sheet for a crunchy, savory snack—perfect for munching immediately.
Pro tips for perfect roasted garlic chickpeas
- Bolded mini-head: Use a high heat to ensure chickpeas become crispy without burning the garlic.
- Bolded mini-head: Toss chickpeas and garlic thoroughly to coat each piece in oil and spices for even roasting.
- Bolded mini-head: Shake the pan halfway through roasting—this promotes uniform crispness and prevents sticking.
- Bolded mini-head: Keep an eye on garlic; it can go from golden to burnt quickly—remove once fragrant and caramelized.
- Bolded mini-head: For maximum crunch, pat chickpeas completely dry before tossing with oil and spices.
- Bolded mini-head: Use fresh garlic cloves for a mellow, sweet flavor—older garlic may turn bitter when roasted.
- Bolded mini-head: Before serving, squeeze fresh lemon over hot chickpeas for a bright, zesty finish.
Common mistakes and how to fix them
- FORGOT to check chickpea dryness → Ensure they are thoroughly dried before roasting.
- DUMPED garlic in raw → Roast garlic until mellow; avoid raw pungency.
- OVER-TORCHED spices → Toast spices gently; burn results in bitter flavor.
- MISSED resting time → Let chickpeas cool slightly for better crunch and flavor.
Quick fixes and pantry swaps
- If chickpeas are soft, roast longer or increase oven temperature slightly.
- When garlic burns, remove immediately—rescue with a squeeze of lemon for brightness.
- Splash a little water on smoky spices to mellow bitterness and refresh aroma.
- Patch over under-crisp chickpeas by roasting a few extra minutes until crunchy.
- Shield delicate garlic cloves from direct heat to prevent over-browning and bitterness.
Prep, store, and reheat tips
- You can prepare the chickpeas and garlic a day in advance. Store them separately in airtight containers in the fridge, where they’ll stay crispy and fragrant for up to 3 days.
- Roasted chickpeas are best enjoyed fresh, but if needed, reheat in a 180°C (350°F) oven for 5-7 minutes until crisp, with a slight shuffling of the pan for even reheating. Expect a warm aroma and some loss of initial crunch.
- Store leftovers in an airtight container at room temperature for a day or two; the chickpeas may soften slightly but still make a snack-worthy crunch after fresh reheat.
- The garlic mellows as it sits, so if you prep it in advance, expect a gentler, sweeter garlic flavor that still retains some smoky depth. Freshly roasted garlic offers the best aroma and punch.
FAQs about Roasted Garlic Chickpeas
1. What does roasted garlic taste like in chickpeas?

Roasted garlic mellows out into a sweet, smoky flavor with a tender texture, unlike raw garlic’s pungency.
2. Can I use canned chickpeas for this recipe?
Using canned chickpeas is quick and easy; just make sure to dry them thoroughly before roasting for crunch.
3. How long should I roast the chickpeas and garlic?
Roasting at 200°C (400°F) for about 25-30 minutes makes the chickpeas crispy and the garlic fragrant.
4. Can I add lemon to the roasted chickpeas?
Yes, adding lemon juice brightens the dish and enhances the smoky garlic flavor, especially if added after roasting.
5. What if my chickpeas aren’t crispy enough?
If chickpeas aren’t crispy enough, roast a few extra minutes or increase oven temperature slightly, watching carefully.
6. How should I store roasted garlic chickpeas?
Storing in an airtight container at room temperature keeps them crunchy for 1-2 days; reheat in oven to revive crunch.
7. What if the garlic burns during roasting?
If garlic burns during roasting, remove it immediately; you can rescue with a squeeze of lemon or a sprinkle of herbs.
8. Can I reduce the oil in this recipe?
Use a good quality olive oil for flavor and even roasting; less oil might make them less crispy but still tasty.
9. How do I season the chickpeas properly?

Over-spicing can overpower the mellow garlic; start with small amounts, then adjust to taste after roasting.
10. Can I prepare this dish in advance?
Yes, you can make this ahead; store cooked chickpeas and roasted garlic separately, then combine and reheat for crunch.
These roasted garlic chickpeas are a reminder that simple ingredients can surprise us with their depth. The aroma alone makes the kitchen feel warm and inviting, and the crunch is just right for a snack that feels both satisfying and familiar.
Whenever I make these, I think about how small tricks—like roasting garlic—can elevate everyday staples. They’re perfect for whenever you need a quick, flavorful bite that’s honest and unpretentious, yet full of personality.