
Vegetable tikkis are a perfect way to showcase the vibrant flavors of each season. As the months change, I love experimenting with what’s fresh at the market—crisp carrots, leafy herbs, even sweet peas. It’s like capturing a moment of the season in every bite, turning simple vegetables into something more festive and lively.
There’s something honest about making tikkis with what’s at hand. No fancy ingredients needed—just a handful of vegetables, some spices, and a pinch of patience. They remind me of childhood afternoons, standing on a stool in the kitchen while my mom gently fried these until they were golden and crispy, filling the house with a warm, earthy aroma.
Focusing on how vegetable tikkis can be a canvas for seasonality, highlighting local produce and fresh herbs that change with the months, making each batch a reflection of the current season’s bounty.
Seasonal veggie canvas
- Falling in love again with the humble veggie, especially when I find that perfect sweet pea or earthy carrot at the market.
- It’s a small victory to turn simple vegetables into crispy, flavorful bites that everyone reaches for.
- Cooking these tikkis reminds me of lazy Sunday afternoons, the smell of spices mingling with fresh herbs, filling the kitchen with warmth.
- There’s a quiet pride in making something from scratch that’s both wholesome and addictive, especially when the kids ask for seconds.
The inspiration behind this dish
- This recipe was born out of a lazy weekend craving for something crispy and veggie-packed but with a twist of nostalgia. I wanted to create a snack that wasn’t just fried and forgettable, but something that celebrated the season’s best produce with a bit of spice and a lot of heart. It’s funny how a simple idea can turn into a little kitchen experiment that sticks around.
- Every time I make these tikkis, I think of my grandmother’s small kitchen, where she’d toss in whatever fresh herbs she had, turning humble vegetables into something special. It’s that feeling of improvising, using what’s on hand, and ending up with a dish that feels both comforting and a bit adventurous. They’re perfect for sharing, especially when everyone’s looking for a quick, satisfying bite.
- heading
- story_type
Historical & Cultural Tidbits
- Vegetable tikkis have roots in Indian street food, where vendors used whatever vegetables were available to create quick, flavorful snacks.
- The concept of frying spiced vegetable patties likely originated from a need to make vegetables more appealing, especially in regions with limited refrigeration in the past.
- These tikkis can be traced back to traditional recipes that used seasonal vegetables, making each batch a reflection of local harvests and climate.
Key ingredients and tips
- Carrots: I like a mix of sweet and earthy, especially when shredded raw — it adds a crisp bite. If carrots are too watery, squeeze out excess moisture before mixing.
- Potatoes: They give the tikkis structure and a soft inside. Use starchy potatoes like Russets for the best binding; if you want lighter tikkis, swap some with sweet potatoes.
- Green peas: I love their pop of sweetness and color, especially in spring. Frozen peas work perfectly, just thaw and mash them slightly before adding.
- Spices: Cumin, coriander, and a pinch of garam masala bring warmth. Adjust to your taste—more cumin for earthiness, less if you prefer milder flavor.
- Herbs: Fresh cilantro or mint brighten the flavor and add freshness. If fresh herbs aren’t available, a sprinkle of dried works but won’t have the same vibrancy.
- Binding agent: I rely on a little flour or breadcrumbs, which help hold everything together. If the mixture feels too loose, add a touch more to prevent cracking during frying.
- Oil: Use neutral oil with a high smoke point, like vegetable or sunflower. When frying, look for a shimmer and listen for a gentle crackle—your cue to flip.
Spotlight on key ingredients
Carrots:
- I love the natural sweetness and bright orange hue they bring. Keep them fresh and crisp for the best texture.
- Potatoes: They act as the binder, turning into a soft, fluffy inside. Use starchy varieties for a sturdier tikki that holds together well.
Green peas & herbs:
- Green peas: Their juicy pop of flavor and vibrant green color add freshness. Frozen peas are convenient and just as sweet when thawed and mashed slightly.
- Herbs: Fresh cilantro or mint lift the flavor with their pungent, aromatic punch. Dried herbs work, but miss that lively brightness.
Notes for ingredient swaps
- Dairy-Free: Swap regular yogurt for coconut or almond yogurt. Keeps the tang but adds a subtle nutty flavor.
- Gluten-Free: Use chickpea or rice flour instead of wheat flour. Expect a slightly different texture, a bit more crumbly.
- Vegan: Replace eggs with flaxseed or chia seed slurry (1 tbsp seeds + 3 tbsp water). It binds well, but may be a touch softer.
- Sweet Corn: Use fresh or frozen corn kernels instead of peas for a smoky sweetness and extra crunch.
- Herbs: If fresh herbs aren’t available, dried cilantro or mint can be used—just use half the amount for potency.
- Oil: For a healthier option, bake the tikkis at 200°C (392°F) until crispy, about 20-25 minutes, flipping halfway.
- Spices: Adjust spice levels—more cumin for earthiness, less garam masala for milder warmth. Freshly toasted spices deepen flavor.
Equipment & Tools
- Large mixing bowl: Combine and mix vegetables, spices, and flour.
- Grater: Shred vegetables evenly.
- Wide skillet or frying pan: Fry tikkis evenly with enough oil.
- Spatula: Flip and handle tikkis during frying.
- Paper towels: Drain excess oil after frying.
Step-by-step guide to vegetable tikkis
- Gather your ingredients: grated vegetables, flour, spices, herbs, and oil. Prepare a large mixing bowl and a plate for shaping.
- a. Grate carrots, potatoes, and any other vegetable you like into a bowl. b. Thaw and mash frozen peas if using. c. Squeeze out excess moisture from grated veggies to prevent sogginess.
- Add spices (cumin, coriander, garam masala), chopped herbs, and about 2-3 tbsp flour or breadcrumbs to the vegetables. Mix well until it holds together.
- a. Take a handful of the mixture. b. Shape into a patty about 2 cm thick and 8 cm wide. c. Place on a plate or tray. Repeat with remaining mixture.
- Heat 1/4 inch of neutral oil in a wide skillet over medium heat (about 160°C / 320°F). Wait until shimmering and a tiny piece of veggie sizzles when dipped.
- a. Carefully place tikkis in the hot oil, leaving space between. b. Fry for about 3-4 minutes until golden brown underneath. c. Flip and cook for another 3-4 minutes until crispy and evenly browned.
- Check for doneness: the tikkis should be crispy outside, soft but cooked inside, and have an aromatic smell. If they are too soft, fry a little longer; if burnt, reduce heat.
- Once cooked, transfer to a paper towel-lined plate to drain excess oil. Let rest for 2 minutes before serving.
Let the tikkis rest for 2 minutes after frying. Serve hot with chutney or yogurt, garnished with fresh herbs for added brightness.
How to Know It’s Done
- Tikkis are golden and crispy outside with a fragrant aroma.
- Internal texture soft but cooked through, no raw vegetable visible.
- Probe the center with a skewer—no raw batter or moisture remains.
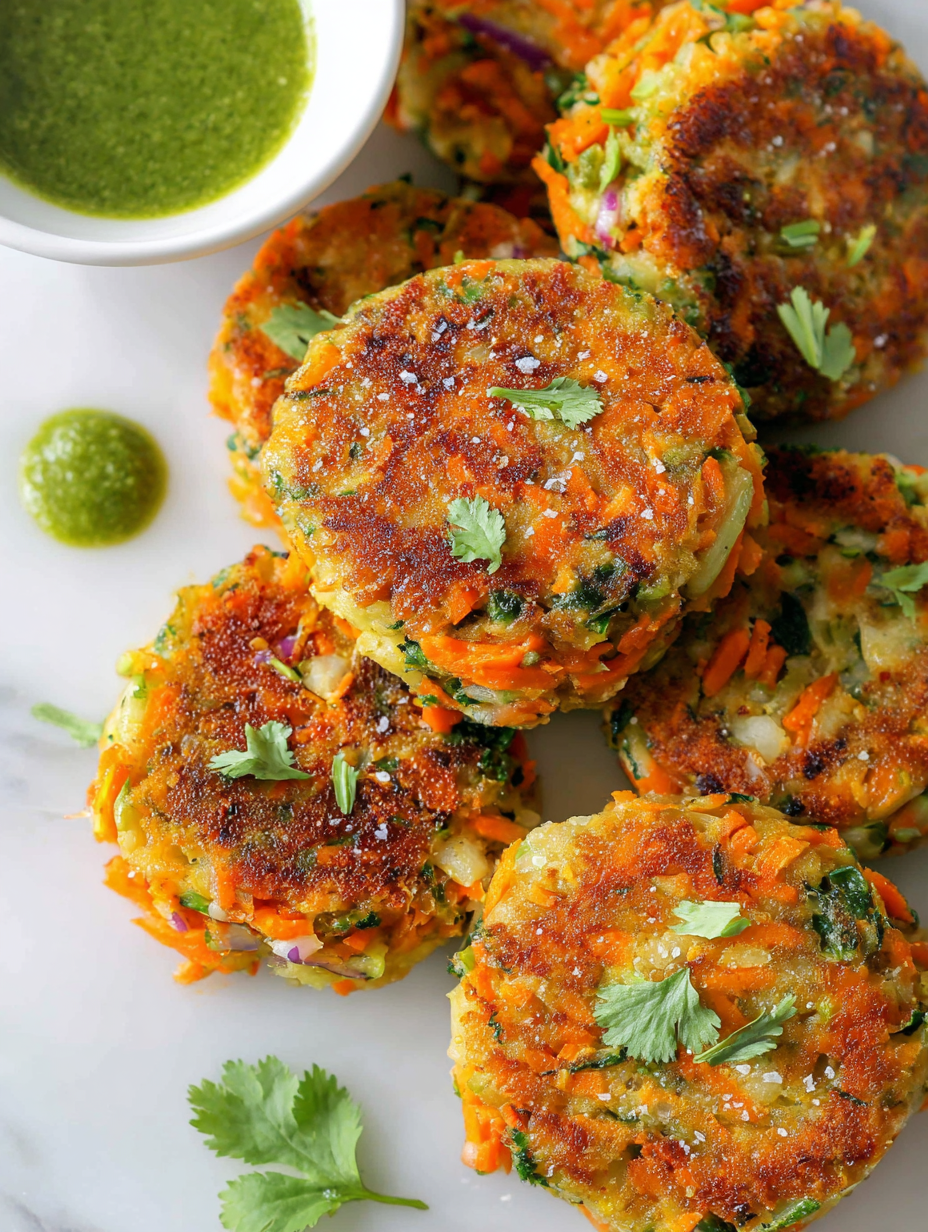
Seasonal Vegetable Tikkis
Ingredients
Equipment
Method
- Grate the carrots into a large mixing bowl, then squeeze out any excess moisture to prevent sogginess.
- Add the mashed potatoes and mashed green peas to the bowl with the grated carrots, mixing well to combine.
- Toast cumin seeds in a small pan until fragrant, then grind or crush slightly before adding to the vegetable mixture.
- Stir in the toasted cumin, coriander powder, garam masala (if using), chopped cilantro, and the flour or breadcrumbs. Mix until everything is evenly incorporated, and the mixture holds together when pressed.
- Shape the mixture into small, flat patties about 2 cm thick and 8 cm wide, placing them on a plate as you go.
- Heat oil in a wide skillet over medium heat until shimmering and lightly crackling when tested with a small veggie piece.
- Carefully place the tikkis in the hot oil, leaving space between each. Fry for about 3-4 minutes until golden brown underneath, then flip and fry the other side for another 3-4 minutes until crispy and deep golden.
- Once crispy and golden, transfer the tikkis to a paper towel-lined plate to drain excess oil. Continue frying remaining patties in batches.
- Let the tikkis rest for 2 minutes to set their structure, then serve hot with chutney or yogurt, garnished with extra herbs if desired.
Pro tips for perfect vegetable tikkis
- Bolded Mini-Head: Use a gentle touch when shaping the tikkis to avoid compacting the mixture, which keeps them light.
- Bolded Mini-Head: Ensure oil is hot enough—shimmering and lightly crackling—before adding the tikkis for even browning.
- Bolded Mini-Head: Flatten each tikki just slightly—about 1.5 cm thick—to ensure crisp edges and soft centers.
- Bolded Mini-Head: Don’t overcrowd the pan; fry in batches to maintain consistent heat and crispiness.
- Bolded Mini-Head: If tikkis are sticking or breaking, add a little more flour or breadcrumbs to the mixture.
- Bolded Mini-Head: For extra crunch, sprinkle a few cumin seeds into the hot oil before adding the tikkis.
- Bolded Mini-Head: Rest cooked tikkis on paper towels to absorb excess oil and keep them crispy.
Common mistakes and how to fix them
- FORGOT to squeeze excess moisture → Squeeze out water from grated vegetables thoroughly.
- DUMPED too much oil → Use just enough oil for shallow frying; too much makes tikkis greasy.
- OVER-TORCHED the tikkis → Lower heat if they brown too quickly; aim for golden, not dark.
- MISSED resting time → Let fried tikkis rest 2 minutes to avoid breakage and retain crispness.
Quick fixes and pantry swaps
- When oil shimmers and crackles, it’s ready for the tikkis.
- Splash a tiny drop of water—if it crackles, the oil is hot enough.
- Patch soggy mixture with a bit more flour to help shape the tikkis.
- Shield delicate tikkis from over-torching by lowering the heat slightly.
- DUMPED too much oil? Use paper towels to absorb excess after frying.
Prep, store, and reheat tips
- Prepare the vegetable mixture a day in advance; keep it covered in the fridge to prevent moisture loss, which can lead to sogginess.
- Cooked tikkis can be stored in an airtight container in the refrigerator for up to 2 days; reheat in a hot skillet until crispy and warm, about 3-4 minutes per side, until you hear a gentle crackle and see a golden hue.
- For freezing, shape the uncooked tikkis on a tray, freeze solid for an hour, then transfer to a zip-top bag. They can last up to a month. Fry directly from frozen, adding an extra minute or two, until crisp and golden.
- Reheating cooked tikkis may soften slightly; crisp them back up in a hot skillet or oven (200°C / 392°F for 10-12 mins), expecting a shimmer of oil and a satisfying crackle.
Frequently Asked Questions
1. How do I prevent the mixture from becoming too wet?
Use a sharp grater for even shredding, and handle the vegetables quickly to prevent moisture loss. A dry mixture helps the tikkis crisp up better during frying.

2. Can I make the mixture ahead of time?
Squeeze out excess moisture from the grated vegetables using a clean cloth or paper towel before mixing. This keeps the tikkis crispy and holds them together better.
3. How long can I store the uncooked tikkis in the fridge?
Yes, you can prepare the mixture a day in advance. Keep it covered in the fridge, and add a little extra flour if it seems too loose before shaping.
4. What’s the best way to tell when they’re done?
Fry the tikkis until they are deep golden and crispy, about 3-4 minutes per side over medium heat. They should make a crackling sound and smell fragrant.
5. What oil works best for frying these tikkis?
Use a neutral oil like sunflower or vegetable, heated until shimmering and crackling when tested with a tiny vegetable piece. This ensures even browning.

6. My tikkis are breaking apart—what should I do?
If the tikkis break while frying, add a bit more flour or breadcrumbs to the mixture to help them hold together better.
7. How can I make the tikkis crispier?
To get extra crispiness, flatten the tikkis slightly and don’t overcrowd the pan. Fry in small batches, maintaining consistent oil temperature.
8. How should I reheat cooked tikkis?
Reheat leftover tikkis in a hot skillet for 3-4 minutes per side until crispy. They might soften in the fridge but crisp up again when reheated.
9. Can I make these vegan?
For a vegan version, substitute eggs with flaxseed or chia seed slurry. The flavor remains good, but the texture might be slightly softer.
10. How can I tweak the flavor of the tikkis?
To customize flavors, add a pinch of turmeric for color, or a squeeze of lemon juice for brightness. Adjust spices according to your taste.
Making vegetable tikkis from seasonally fresh produce feels like capturing a fleeting moment—bright, crisp, and full of life. Each batch reminds me that simple ingredients, treated with care, can turn into something unexpectedly satisfying. It’s a dish that’s rooted in tradition but adaptable to whatever’s at hand.
In a way, these tikkis are more than just a snack; they’re a small celebration of the season’s bounty. Whether served as a quick lunch or a casual appetizer, they bring a bit of warmth and familiarity. No matter how many times I make them, I’m always surprised by how a humble mix of vegetables can turn into something memorable.