
Getting that crispy exterior on paneer cutlets without turning them into dry, flavorless hockey pucks is a small miracle in the kitchen. Over the years, I’ve learned that the secret lies in the right balance of heat, timing, and that magical moment when the coating reaches just the right golden hue. It’s about patience and a bit of watchful eye, especially when you’re trying to get that perfect crunch.
These cutlets are my go-to for a snack that feels indulgent but isn’t heavy. They remind me of lazy weekend afternoons, the smell of spices drifting through the air, and the satisfying crackle as they hit the pan. Every batch feels like a small victory, especially when I get that tender paneer inside, contrasted with a crisp, savory crust.
Focusing on how to achieve the crispiest exterior while keeping the paneer tender inside, this recipe emphasizes the importance of technique and temperature control, sharing personal tips I’ve gathered from trial and error to perfect that perfect crunch.
The crunch that hides inside
- I love how the first bite crackles with that perfect crunch, making me smile every time.
- There’s a nostalgic rush when I smell the warm spices mingling with the toasted paneer.
- Achieving that tender, melt-in-your-mouth interior after so many tries feels like a small victory.
- The chaos of frying is worth it when I see those golden, crispy edges glisten just right.
- Nothing beats the pride of serving these cutlets to friends and watching them ask for seconds.
The inspiration behind this dish
One rainy afternoon, I found myself craving something crispy and cheesy but didn’t want to turn to the usual snacks. I remembered a batch of leftover paneer from a weekend curry and thought, why not turn it into something golden and satisfying? That moment, with the aroma of spices lingering, sparked the idea that became these paneer cutlets. It’s a simple dish, but the joy of transforming humble ingredients into something special keeps me coming back to it.
Contextual origin, trivia, or history
- Paneer cutlets have roots in North Indian street food, where vendors served them crispy and quick to eat on the go.
- The technique of shallow frying paneer with spices likely evolved from traditional snack stalls that favored crisp textures and bold flavors.
- In some regions, these cutlets are known as ‘paneer tikki’ and are often served with tangy chutneys, blending street food with home cooking.
- The popularity of paneer in vegetarian Indian cuisine makes this dish a favorite for those seeking hearty, protein-rich snacks that are easy to customize.
Ingredient breakdown: key components
- Paneer: I like to use fresh, soft paneer that feels slightly crumbly. It melts nicely inside, but if you want more firmness, try a firmer variety or pressing out excess moisture before mixing.
- Breadcrumbs: I prefer panko for extra crunch, but regular fine breadcrumbs work fine. Toast them lightly before adding for a nutty flavor that crisp up beautifully.
- Spices: Garam masala, cumin, and a pinch of chili powder give a warm depth. Adjust the heat level based on your spice tolerance—I like a little smoky kick, so I toast my spices first.
- Binding agents: A small egg helps hold everything together, but if you’re vegan, mashed potatoes or a bit of besan (gram flour) work well—just expect a slightly different texture.
- Oil: Use neutral oil with a high smoke point, like sunflower or canola. I keep the oil just enough to coat the pan and shimmer, ensuring even crisping without deep-frying.
- Optional herbs: Finely chopped cilantro or mint adds freshness. I like to sprinkle some on top after frying for a bright contrast to the savory crust.
- Lemon juice: A squeeze right before serving brightens the flavor and cuts through the richness, especially if the paneer is a bit milder. Just a few drops, so don’t drown it!
Spotlight on key ingredients
Paneer:
- I prefer fresh, soft paneer that crumbles easily but melts enough to give a tender bite inside. If your paneer feels too firm, pressing out excess moisture helps it blend better.
- It’s the star of these cutlets—its mild milky flavor and soft texture contrast beautifully with the crispy exterior. Keep an eye on freshness; older paneer can become rubbery.
Breadcrumbs:
- I like to use panko for an extra crunch, but standard fine breadcrumbs work too. Toast them lightly before coating for a nutty, toasty flavor that crisps up well and adds a golden hue.
- The texture of the coating is crucial—aim for a light, even layer that crackles at first bite. If crumbs are too coarse, they may not stick as well.
Notes for ingredient swaps
- Dairy-Free: Use mashed potatoes or tofu instead of paneer for a similar texture, but expect a slightly softer bite.
- Gluten-Free: Substitute regular breadcrumbs with crushed rice crackers or gluten-free panko for crunch without wheat.
- Spice Level: Skip or reduce chili powder if you prefer milder flavor; add a dash of smoked paprika for depth instead.
- Herbs: Fresh cilantro can be replaced with chopped mint or parsley, depending on your flavor mood.
- Oil: If you want a lighter version, try baking the cutlets at 200°C (390°F) until crispy, about 20 minutes, flipping halfway.
- Binding Agent: Vegan? Replace the egg with a tablespoon of flaxseed meal mixed with water for that gluey effect.
- Lemon Juice: Brighten the flavor with a splash of vinegar or a dash of amchur (dried mango powder) for tang.
Equipment & Tools
- Frying pan: To evenly cook and crisp the cutlets.
- Spatula: To flip and handle the cutlets gently.
- Mixing bowl: To combine the paneer and spices smoothly.
- Plate for coating: To hold the breadcrumbs for easy coating.
Step-by-step guide to paneer cutlets
- Gather your equipment: a frying pan (preferably non-stick), a spatula, a mixing bowl, and a plate for coating. These will help you control heat and handle the cutlets without breaking them.
- Prepare the paneer: crumble 200g of fresh paneer into a bowl. Break it apart with your fingers until it’s crumbly but not too fine. This texture is key for tender bites inside a crispy crust.
- Mix the filling: add 2 tablespoons of finely chopped herbs (cilantro/mint), 1 teaspoon of garam masala, 1/2 teaspoon of chili powder, and an egg. Stir well until combined. If too sticky, sprinkle in a little breadcrumbs.
- Shape the cutlets: divide the mixture into 4-6 portions. Roll each into a ball, then flatten gently into a patty about 1.5 cm thick. Keep them uniform for even frying.
- Coat the cutlets: spread some breadcrumbs on a plate. Gently press each patty into the breadcrumbs, coating all sides evenly. This creates the crispy exterior. If crumb coating tears, patch with a bit of extra egg wash.
- Heat the oil: pour about 1 cm of neutral oil into the pan. Heat over medium heat (~160°C / 320°F). Wait until the oil shimmers and a breadcrumb sizzles when dropped in.
- Fry the cutlets: place them carefully in the hot oil. Cook for about 3-4 minutes per side, until golden brown and crispy. Use tongs or a spatula to flip gently. The edges should crackle and turn deep amber.
- Check for doneness: the cutlets should feel firm and have a deep golden crust. The paneer inside should be tender and slightly oozy when cut. If not done, cook a minute longer but watch for over-browning.
- Rest and serve: transfer to a paper towel-lined plate. Let sit for 2 minutes to settle. Serve hot with tangy chutney or a squeeze of lemon for brightness.
Let the cutlets rest on paper towels for 2 minutes. Serve immediately while hot and crispy. Garnish with fresh herbs or a squeeze of lemon for extra zing.
How to Know It’s Done
- Crust is golden and crispy, with a slight crackle when pressed.
- Paneer inside is tender and slightly oozy, not dry or rubbery.
- Oil temperature remains steady around 160°C (320°F) for even frying.
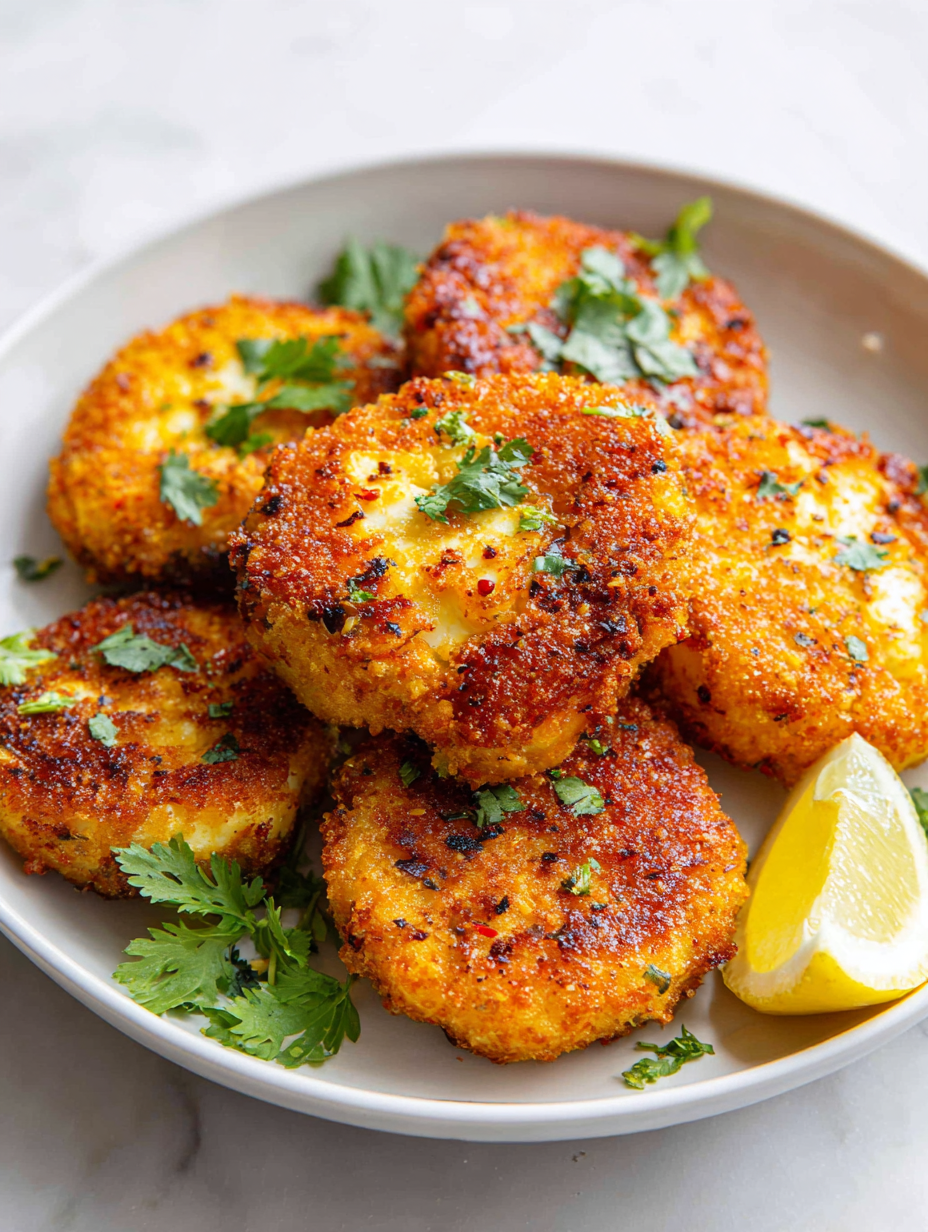
Crispy Paneer Cutlets
Ingredients
Equipment
Method
- Crumble the fresh paneer into a large mixing bowl until it resembles coarse crumbs, ensuring it’s evenly broken apart for a tender interior.
- Add the finely chopped herbs, garam masala, chili powder, a pinch of salt, and the egg to the paneer. Mix everything together thoroughly until the mixture is cohesive but still crumbly, which will make shaping easier.
- Divide the mixture into 4 to 6 equal portions. Gently shape each portion into a patty about 1.5 cm thick, pressing firmly to ensure they hold together.
- Pour the panko breadcrumbs onto a plate. Gently press each patty into the breadcrumbs, coating all sides evenly. Pat lightly to make sure the coating sticks well, sealing in the spices.
- Heat about 0.5 cm of neutral oil in a frying pan over medium heat until shimmering and a breadcrumb dropped in sizzles immediately. This indicates the oil is hot enough for frying.
- Carefully place the coated patties into the hot oil, making sure not to overcrowd the pan. Fry each side for about 3-4 minutes until deep golden brown and crispy, flipping gently with a spatula.
- Once the cutlets are evenly golden and crispy, remove them from the pan and drain on paper towels to absorb excess oil. Listen for that satisfying crackle as they land on the paper.
- Let the cutlets rest for a minute, then serve hot with your favorite chutney or a squeeze of lemon for added brightness. Enjoy the crispy outside with the tender, flavorful paneer inside!
Pro tips for perfect paneer cutlets
- Use medium heat to prevent burning the breadcrumbs while ensuring a crispy crust.
- Chill the shaped cutlets for 10 minutes before frying to help them hold shape and crisp evenly.
- Drop breadcrumbs slowly into hot oil; listen for a consistent crackle indicating proper temperature.
- Flip the cutlets only once they release easily from the pan to avoid breaking the coating.
- For an extra crispy crust, double coat the cutlets—dip in egg wash again after initial coating.
- Rest the fried cutlets on paper towels briefly to absorb excess oil and maintain crunch.
- Serve immediately after frying for best texture; reheat in oven at 180°C (350°F) for 10 minutes if needed.
Common mistakes and how to fix them
- TOO MUCH OIL: Drain excess oil immediately, or cut heat to prevent sogginess.
- UNDERCOATED: Ensure even breadcrumb coating to avoid uneven crispness and sticking.
- OVERCOOKED: Watch for dark brown edges; overcooking leads to dryness inside.
- MISSED TEMPERATURES: Use a thermometer; oil should shimmer at 160°C (320°F).
Quick fixes and pantry swaps
- When oil shimmers, splash a tiny breadcrumb to test; if it crackles immediately, you’re ready.
- If cutlets stick, increase oil temperature slightly or chill them before frying for better release.
- Splash a few drops of water if oil splatters excessively; it helps control the shimmer and crackle.
- Patch torn breadcrumb coating by pressing extra crumbs onto the cracked spots before frying.
- Shield delicate cutlets from over-torching by lowering heat once they turn golden, avoid bitter flavors.
Prep, store, and reheat tips
- Prepare the paneer mixture and shape the cutlets a day in advance; keep covered in the fridge to allow flavors to meld and firm up, which helps them hold shape during frying.
- Store the raw or pre-coated cutlets in an airtight container in the fridge for up to 24 hours; the coating may soften slightly, so re-crisp in the oven at 180°C (350°F) for 5-7 minutes before frying.
- Cooked cutlets can be refrigerated for up to 2 days; reheat in a hot skillet or oven until the crust is crispy and the interior is warmed through—listen for that satisfying crackle.
- Reheated cutlets may lose some crispness; for best texture, re-crisp in a hot oven or toaster oven, watching carefully so they don’t burn, until they shimmer with a golden sheen and smell toasted.
Top questions about paneer cutlets
1. How do I choose the best paneer?
Use fresh, soft paneer that crumbles easily; it melts inside but stays tender. If your paneer feels firm, press out excess moisture first.
2. What breadcrumbs work best?
Breadcrumbs should be toasted lightly for extra crunch, but you can use store-bought if pressed for time. Panko gives a lighter, crispier coating.
3. How hot should the oil be?
Ensure the oil is hot enough—shimmering at 160°C (320°F)—so your cutlets fry quickly and get that crispy crust without absorbing too much oil.
4. How do I know when they are done?
Fry the cutlets until they are deep golden and crispy, about 3-4 minutes per side. Check that the paneer inside is tender and slightly oozy when you cut into them.
5. Should I chill the cutlets before frying?
Shape the mixture into even patties and chill for 10 minutes before frying. This helps them hold shape and crisp evenly without falling apart.
6. What if the breadcrumb coating tears?
If the coating tears, patch it with a little beaten egg or extra breadcrumbs before frying. This keeps the crust intact and crispy.
7. How can I tell if the oil is ready?
Preheat the oil thoroughly and maintain steady temperature. When in doubt, test with a breadcrumb; if it crackles immediately, you’re ready.
8. How do I reheat the cutlets?
Reheat cooked cutlets in a hot oven at 180°C (350°F) for about 5-7 minutes. They’ll regain their crunch and warmth while staying tender inside.
9. Can I make these vegan?
For a vegan version, replace egg with mashed potatoes or a flaxseed meal slurry. Expect a slightly softer crust, but still delicious.
10. How do I enhance the flavor?
Add a squeeze of lemon or a dash of vinegar just before serving to brighten flavors and cut through the richness of the paneer.
Frying these paneer cutlets always takes me back to my childhood kitchen, where the smell of spices mixed with the sizzle of oil. Each batch reminds me that good simple food is about patience and attention to detail, not perfection. Sometimes, the best moments happen in those small, imperfect victories of crispness and tender cheese.
Now, whenever I make these, I think about sharing them with friends and the relaxed, messy joy of a busy kitchen. They’re more than just snacks — they’re a way to slow down, enjoy the process, and appreciate the little crispy, cheesy rewards.